

New to this series? Check out the previous posts here:
USE #5: Help mark first stitch of round when frogging
Let’s face it, sometimes you just need to unravel a part of a piece because you messed up. We all do it! I especially need to when designing because I am experimenting with different stitch patterns and counts. When frogging a section in amigurumi you need to be careful that you don’t loose track of where the first stitch of each round is located, otherwise it can be tricky figuring it out after. One method is to slowly unravel and count each stitch you take out (so slow!). Another method is to unravel it all the way to where you need to and then figure out based on the locations of increases or decreases where the start of a round is (tricky!). Or, a quick and simple way, is to use a stitch marker!
When you discover that you need to do a bit of frogging, make sure you have a stitch marker in the front loop of the first stitch of your current round and leave it there as you pull the stitches out.
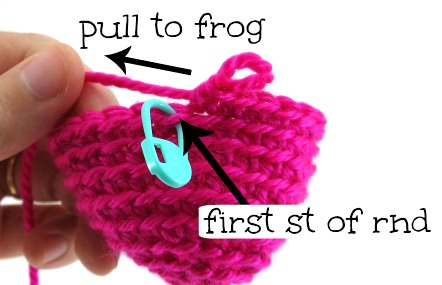
You can pull the stitches out super fast and the stitch marker will stop you from pulling out beyond that one round. It is important that the stitch marker be in the front loop, or it won’t stop you from unravelling too much. After unravelling, you will end up with the stitch marker in the working loop, preventing you from pulling out any stitches from the next round.

Once that round is pulled out, simply move the marker into the first stitch of the next round – it is the next stitch just to the left (if you are right handed) of the loop the stitch marker is in.
 Then pull the yarn again and the marker will prevent you from pulling too far again! You just need to repeat this until you have pulled out all the rounds you need to frog.
USE #6: Mark a stitch that confuses you or you want to keep track of
This use is most helpful for beginners who aren’t as savy at identifying different stitches and stitch parts, but I still use it sometimes, especially when I am branching out from amigurumi!
When I am learning a new crochet technique or stitch pattern that includes stitches, such as slip stitches or chains, that I can’t identify very well when I return to them, I will place a stitch marker in that stitch, right after I have created it, so that I can find it again easily.
Maybe you need to crochet into a chain space or into a single crochet that kind of gets lost amongst the other stitches – if you mark it right after you make it, you can find it again! Or, maybe you keep getting confused about whether that stitch you see is a slip stitch that you are supposed to ignore (because it is simply for joining a round), or an actual stitch you should crochet into – simply mark the slip stitch so you know which one it is!
Eventually, once you are better at identifying how each stitch looks and what loop belongs to which stitch, you won’t need to mark them as much, but I found this technique super helpful when starting out (and still use it sometimes now!).
Next post in series: Uses #7 and #8
Don’t forget to sign up for my amigurumi newsletter to receive emails filled with ami fun. You can also follow me on facebook, twitter, instagram, and pinterest to keep up to date on all things hookabee.
Until next time,


That’s a great tip for undoing amigurumi……unfortunately I think I will it often
LikeLiked by 1 person
I use it A LOT! Frogging your work is just part of the craft 😛
LikeLike
When I was first learning to crochet, I used a stitch marker to mark the first stitch on each row because I could never find it and kept accidentally decreasing. Eventually I got up the nerve, and the skill, to work without it.
LikeLiked by 1 person
I did the same thing! I got so frustrated until I started using the stitch markers.
LikeLike