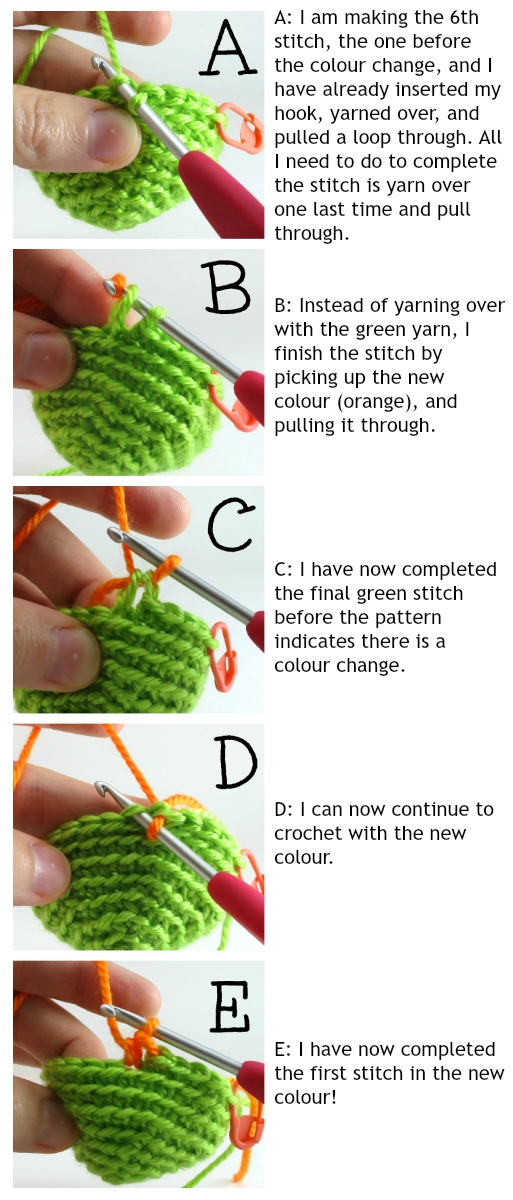
Many amigurumi patterns include colour changes – a step in which you need to pick up new yarn that is in a different colour than the one that is currently on your hook. This may seem a little daunting at first, but don’t worry! It really isn’t that difficult once you know how to do it right. The trick is to pick up the new coloured yarn during the stitch BEFORE the actual colour change in the pattern. The last yarn over (yo) of the stitch before you need to change colours is made with the new yarn. Lets look at it in pictures!
For example, lets say your pattern has for the next round: 6 sc in green, 4 sc in orange, 20 sc in green. You do your first 5 sc in green as you normally would, but then for the last green stitch (stitch 6), your last yarn over for the stitch will be with the orange yarn:
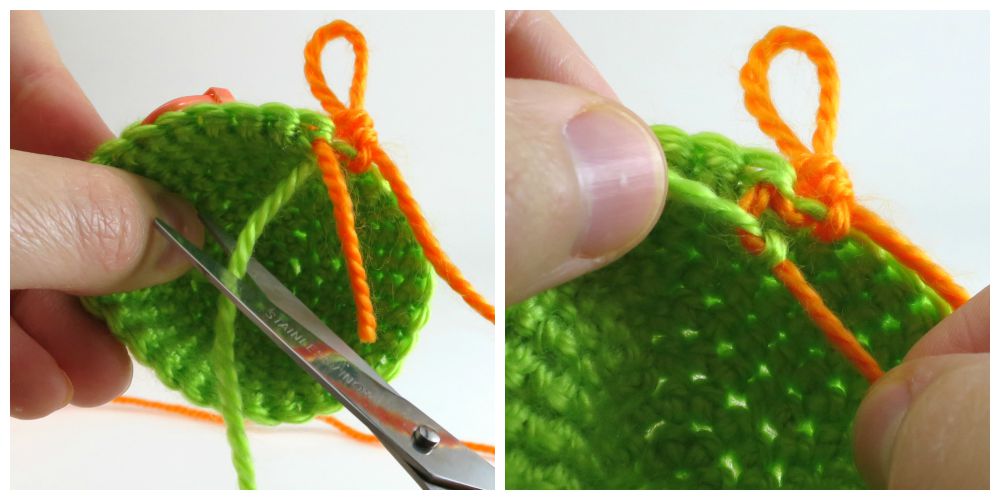
Then you simply continue to crochet normally with the orange yarn…until the last orange stitch! For the last orange stitch, the 4th one, you need to do the same thing you did previously – for the last yo, pick up the green yarn. You will then have something that looks like this:
But what is going on behind all of that? What do you do with all the ends? There are a few things that can be done, and which one you choose depends on both your project, and your preference:
The simplest thing to do is to cut the yarn at each colour change and tie a couple knots with both ends right after completing the change. Using this method, you know your stitches at the colour change will remain nice and even and tight (ie. won’t become loose and wonky), BUT you need to stop crocheting and put down your hook after every single colour change, which can be tedious if you have a lot of colour changes. If you only have one colour change within the pattern, this is obviously the method to use, but if you are going to be changing back to the original colour again, like in the example above, you can use this option OR one of the two that follow.
A second method is to NOT cut the yarn of the first colour you dropped, but simply pick it up again when you need to change back to that colour. In this method, the yarn will simply be ‘stranded’ along the back of the piece, crossing over the stitches you made in the other colour.With this method you don’t have to tie as many knots, but the stranding only works if it is across a short distance. The distance is short when you only make a few stitches in the new colour before switching back, OR you are making short stripes in your amigurumi so the colour changes are right on top of each other without many rounds in between (in this case your strand will go vertical).Once the distance between the colour changes is too long, however, it will be more difficult to create the right tension on the yarn strand. If there is a lot of slack in the strand, you will not only be wasting a lot of yarn, but the stitches at the colour changes may become loose. If the yarn strand is too tight, the shape of your amigurumi will be strange and it will be difficult to stuff.
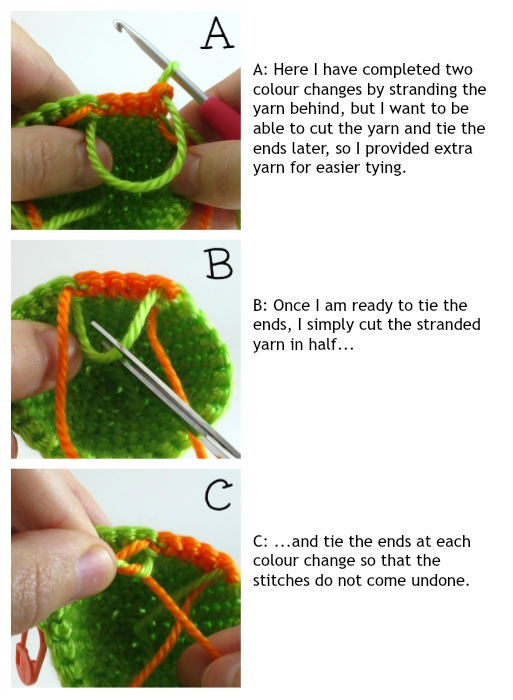
You could also use a combination of these two methods. You may want to strand the yarn behind at first so that you don’t have to put your hook down and stop crocheting at each colour change, but then go back and cut and tie the yarn all at the same time later. This method may use up more yarn if the strands are long, but will be faster and less tedious than tying right after each colour change. If you are going to use this method, make sure that the yarn that is being stranded behind is long enough to be used to make knots after you cut it.
One final tip! When tying knots at the colour changes, don’t pull them too tightly. Pull the yarn ends just enough so that both your stitches at the colour change are the same size as the surrounding stitches. If you pull too tightly, not only will the stitches be noticeably smaller than the rest, but they will be harder to crochet into.
Until next time,
3 responses to “Clean colour changes in amigurumi”
[…] of changing colours during the last yarn over of a stitch. Unfamiliar with this method? Read my general colour change tutorial first! Which stitch you change colours in differs, however, when you are working in both loops vs. back […]


3 responses to “Clean colour changes in amigurumi”
[…] of changing colours during the last yarn over of a stitch. Unfamiliar with this method? Read my general colour change tutorial first! Which stitch you change colours in differs, however, when you are working in both loops vs. back […]
Very nice, great instructions too!
Thanks so much Crafty Di!