
 This is the second post in a tutorial series on how to read amigurumi crochet patterns. Previously, I looked at the most common abbreviations used in written amigurumi patterns – if you haven’t already, I recommend reading it before continuing with this post. Now, I will take you through, line by line, how to read a written hookabee pattern. This will not only help you with reading hookabee patterns, but also those designers who write similarly.
Lets go through how to read the pattern for a simple fin shape:
Fin: (make 2)
With A, make a magic ring, 1 ch
rnd 1: 6 sc in magic ring (6)
rnd 2: inc in each st around (12)
rnd 3: (inc, 1 sc) 6 times (18)
rnd 4: 7 sc, 2 dec, 7 sc (16)
rnd 5: 6 sc, 2 dec, 6 sc (14)
rnd 6: 3 sc, 4 dec, 3 sc (10)
Fasten off, leaving a long tail to attach to body.
Line 1 – Fin: (make 2)
This line indicates that the following instructions are to make a fin for your amigurumi, and that you are supposed to make two of them total; therefore, after making one fin, you need to repeat all the instructions again to make a second fin that is exactly the same as the first.
Line 2 – With A, make a magic ring, 1 ch
Using colour A yarn (refer to the colour key in the pattern for the actual colour used), make a magic ring (which is the same thing as a magic circle) and then make one chain, “1 ch”, stitch. You can see how to make a magic ring using my written or video tutorial. These tutorials include a chain stitch after making the magic ring – this is the “1 ch” indicated at the end of this line.
Line 3 – rnd 1: 6 sc in magic ring (6)
Now you make your first round of the piece, “rnd 1”. For this round, you make 6 single crochet, “6 sc”, stitches total, and they are all made into the magic ring you just made in Line 2.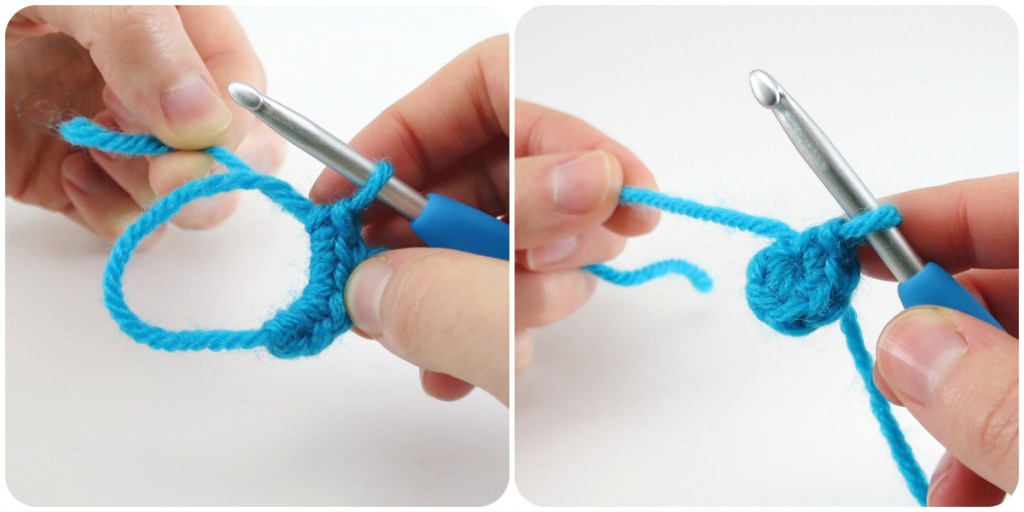
The number in brackets at the end of the round, and at the end of every round, indicates the number of stitches you should have once you have completed that round. For this round, because you made 6 single crochet stitches into the magic ring, you should have 6 stitches total in the end = (6). These total stitch counts are super helpful because you can count your stitches and make sure that you did everything correctly for that round before moving on – it is always best to catch a mistake sooner rather than later so you don’t have to undo so much of your work.
Line 4 – rnd 2: inc in each st around (12)
Next, for round 2, “rnd 2”, you are going to increase, “inc”, in each of the stitches from the last round, all the way around the piece. An increase means you make two single crochet stitches into the same stitch. You have 6 stitches from the previous round to crochet into, therefore you will be making 6 increases total. In other words, you will make 2 single crochet stitches into each of the 6 stitches, so you will have 12 stitches total at the end of the round = (12). For this round, you will want to place a stitch marker on the first stitch you make so that you know where the round started. When you come back around to the marker, you then know you have completed a round and should have the number of stitches indicated in the brackets at the end of the line. Do this for every round – move the marker up into the first stitch of each new round you start. Read my tutorial on marking the start of a round using a stitch marker for more detailed instructions.
Line 5 – rnd 3: (inc, 1 sc) 6 times (18)
For round three, there is a repeat. The “inc, 1 sc” within the brackets means you will make an increase (so 2 single crochet stitches) in the next stitch, followed by 1 single crochet stitch in the stitch after that. You need to crochet this entire sequence, “inc, 1 sc”, 6 times total, and this will bring you all the way around, back to your marker in the first stitch of the round. Basically, it is the same as writing: inc, 1 sc, inc, 1 sc, inc, 1 sc, inc, 1 sc, inc, 1 sc, inc, 1 sc (18) – but is much easier to read and follow!
If you aren’t sure you are interpreting the instructions correctly, see if the math all adds up. For this round, you are increasing 6 times total, so that means you will make 12 stitches from the increases (because each increase is 2 single crochet stitches), plus you are making 1 single crochet stitch 6 times: 12+6 = 18, which is the same as the total stitch count!
You can also compare the previous round’s stitch count to the current round’s and look at how many increases and decreases were made during the current round. For example, the previous round ended with just 12 stitches, then there were 6 increases in the current round: 12+6 = 18.
Line 6 – rnd 4: 7 sc, 2 dec, 7 sc (16)
For round 4, you get to do some decreases. A decrease, “dec”, is when you single crochet the next two stitches together (same as sc2tog). Start the round by making 7 single crochet stitches, “7 sc”, consecutively (so, 1 sc in each stitch, for 7 stitches). Next, you make 2 consecutive decreases, “2 dec”, (so, sc two stitches together, twice). Then end the round with another set of 7 single crochet stitches, like at the start of the round. Because you are making two decreases this round, your stitch count will go from 18 to 16. The long way to write this round is: 1 sc, 1 sc, 1 sc, 1 sc, 1 sc, 1 sc, 1 sc, dec, dec, 1 sc, 1 sc, 1 sc, 1 sc, 1 sc, 1 sc, 1 sc (16).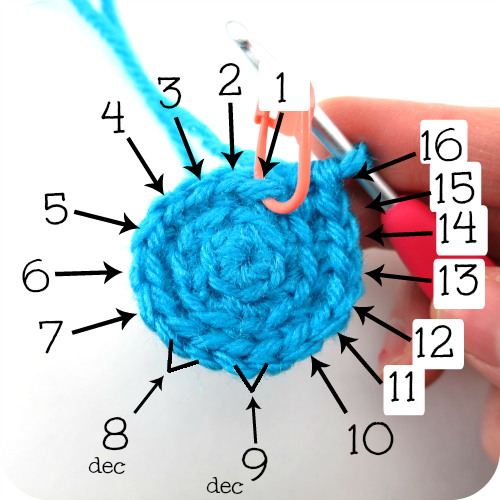
Line 7 – rnd 5: 6 sc, 2 dec, 6 sc (14)
This round is very similar to the last round, but instead of starting and ending with 7 single crochet stitches, you make only 6. Written out fully, this round means: 1 sc, 1 sc, 1 sc, 1 sc, 1 sc, 1 sc, dec, dec, 1 sc, 1 sc, 1 sc, 1 sc, 1 sc, 1 sc (14). Again, because there are two decreases this round, the stitch count goes from 16, down to 14.
Line 8 – rnd 6: 3 sc, 4 dec, 3 sc (10)
Round 6 is like the previous two rounds, but this time you only make 3 single crochet stitches before and and after the decreases, and there are 4 decreases, one directly after another, instead of just 2. This is the same as writing: 1 sc, 1 sc, 1 sc, dec, dec, dec, dec, 1 sc, 1 sc, 1 sc (10). Because there were four decreases this round, the stitch count drops from 14 to 10.
Line 9 – Fasten off, leaving a long tail to attach to body.
Fastening off basically means you can cut the yarn because you don’t have any more stitches to crochet. When the instructions say to “leave a long tail”, make sure you don’t cut the yarn too close to the piece, but instead several inches away. Usually, when the instructions say to leave a long tail, this strand of yarn is used to attach the piece to another piece, so you want to leave enough yarn to allow you to do this. A good estimate is to leave a minimum of 6 inches, or 2.5-3x the length of the distance you need to sew if it is a larger piece.
Once the yarn is cut, simply pull on the working loop that is around your hook until you pull the yarn end through the last stitch. There are other ways to fasten off (another tutorial in the future, perhaps?), but this is the simplest.
One more thing, this is what it may look like if you have to do the same sequence of stitches for multiple rounds, one after the other:
rnd 5-8: sc in each st around (18, 4 rnds)
This just means that for rounds 5, 6, 7, AND 8, you are simply crocheting 1 single crochet stitch into each stitch. Within the final brackets, the “4 rnds” after the total stitch count, “18”, is just there to help you see the number of rounds you are repeating at a glance. Each of the 4 rounds should have 18 stitches total.
And that is it! If there is still something that is unclear or something that is in a hookabee pattern that is not explained here, please let me know in the comments below. Next, I will go through some examples of written instructions that are different from my own style.


10 responses to “How to read amigurumi patterns: Part 2”
1: chain 15, starting from second chain, inc, 12 sc, 4sc in one stitch, 12 sc, inc =32 stitches.
2. 2inc, 12 sc, 4inc, 12sc, 2inc= 40 stitches
I have tried this several times- and I cannot get it to look like the original. Hers looks like a block- mine turns into a circle. Trying to make a chicken. I’m unsure what I am doing wrong? If I follow the original starting from 2nd chain- and only do 2inc on 12 sc- I get the 32…. But it makes a twisted coil… I understand the individual instructions- but I’m not understanding them as written together. Help?
Hello! It looks to me like you work on both sides of the foundation chain of 15, so after making the 4 sc into the last ch, you rotate the piece and work across the other side of the chain. Are you doing this?
Megan
(inc, sc3) 3 times (15 sts)
(inc, sc4) 3 times (18 sts)
(inc, sc5) 3 times (21 sts)
Hello! Do you have a specific question about these rounds? Basically, you repeat everything in each bracket a total of 3 times. If you write out the first round fully, it would look like this:
inc, 3 sc, inc, 3 sc, inc, 3 sc = 15 stitches total.
Hope that helps!
Megan
(Dec)x2 times sc in next6 sts(dec)x4times sc in next 6 sts=18. Started with 24 sts. Does 2x mean 2 dec consecutive and again (dec) x4 mean 4 dec consecutively and the continue to sc 6 to end? I’m stymied?
I would say that is 2 decreases consecutively, so dec, dec for (dec)x2 and dec, dec, dec, dec for (dec)x4. Try it out and see if you get the right number of stitches! But the math looks right to me.
Rows 7-9: Ch 1, sc dec over first 2 sts, sc in next 20 (18,16) sts, sc dec over last 2 sts, turn. (22, 20, 18 sts)
I do not understand the numbers in parentheses
Hello! What pattern is this for? Without having the pattern in front of me, it looks like, because the instructions are for three rows, the first number outside the bracket is for row 7, the next number (inside the bracket) is for row 8, and the last number in the bracket is for row 9. The three numbers in the last bracket are the number of stitches you should have at the end of each round (so 22 after round 7, 20 after round 8, and 18 after round 9). Hope that helps!
[…] Continuing with how to read written amigurumi patterns, I will now take you through different ways to write the same instructions. Missed the first two parts of the series? Catch up here: Part 1 & Part 2. […]
[…] time, I will take you through how to read a hookabee pattern that uses some of these […]