

We have finally reached the last post in this series! If you missed out on the previous posts, you can check them out here:
USE 7: Hold pieces in place when attaching them
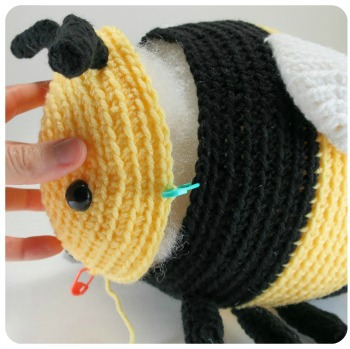
With almost all amigurumi patterns, you need to attach smaller pieces onto larger pieces by sewing them together. Most often people will suggest to use normal straight pins to prevent a piece from migrating across your ami’s body as you are trying to sew it in place, but when you crochet through the back loops only, I find stitch markers are a better choice.
When working through the back loops only you have the handy dandy front loops on the surface of the pieces, which you can hook your marker into. When attaching pieces, bring your marker through both a loop on the piece you are attaching AND a loop on the piece you are attaching it to, and it will hold them together in the location you want them as you sew. Unlike straight pins, the markers won’t poke you or fall out, and they work even when you attach pieces before stuffing your ami.

This technique works when attaching an open piece to a closed piece (as pictured above), a closed piece to a closed piece, and when attaching two open pieces together, like in my Bobby the bumble bee pattern:
USE 8: Mark the locations of where pieces will be attached
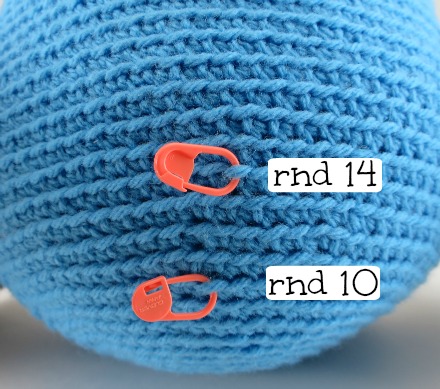
You can use stitch markers to map out where you want all the limbs and eyes to go before picking up your needle to attach them. This way, everything will be more evenly spaced and you will know where you want everything in relation to each other.
Say the pattern specifies to place a leg between rounds 10 and 14. You can place a marker on rnd 10 and another on rnd 14, which allows you to then better visualize how much space it will take up and where you want it to be placed along those rounds. It is much easier to move around the stitch markers when deciding on placement than unattaching pieces you already sewed on that are not quite right.
That concludes the stitch marker series! At least until I discover yet another use for them. Do you use stitch markers in other ways? I would love to hear about new techniques.
Until next time,


One response to “Stitch markers series: Uses #7 & #8”
[…] Next post in series: Uses #7 and #8 […]